

Migrating to AWS is not a simple shift of your workloads from one environment to another, it requires detailed assessment and planning for achieving a real “transformation” that unlocks the benefits and opportunities of the cloud.
However, with all the complications that it involves, migration does not have to mean taking applications offline or asking users to tolerate service unavailability for hours. With the right planning, most of the migration work can happen while the existing environment continues serving production traffic.
The key idea for minimizing downtime is to separate data synchronization from application cutover, meaning that the data is continuously replicated to the cloud in the background until a minimum delta is maintained, then the cutover occurs where the original app environment is frozen, final delta is synced, and traffic is shifted to the new environment. The specific technique for achieving this can differ depending on the type of workload, but the concept remains the same.
Other practices can also be combined to help minimize the downtime like automating the target environment provisioning with Infrastructure as Code (IaC), and moving traffic gradually rather than all at once, incorporating a canary deployment strategy for the migration.
In this article, we’ll discuss how to plan for an AWS migration that achieves a minimal user downtime. We’ll cover the main phases of a migration including setting a migration strategy, exploring the type of workloads, planning the cutover and rollback, and monitoring the migration progress.
1. Start With a Migration Strategy, Not a Cutover Date
It’s important to keep in mind that the goal of a low-downtime migration is not simply the speed or how fast we move our services, but rather to build a parallel environment on AWS that is in sync with the existing environment, validate it under real conditions, and gradually switch users to it.
Therefore, before moving anything, we need to build an inventory of our current applications and their dependencies to know what a parallel environment should include.
For each workload, we need to identify:
- Application servers and virtual machines
- Databases and database dependencies
- File shares and object storage
- Containers and container registries
- External APIs and integrations
- Authentication and identity dependencies
- DNS records and load balancers
- Scheduled jobs and background workers
- Monitoring, logging, and alerting
- Hard-coded IP addresses or hostnames
- Compliance and security requirements
Then group workloads into migration cycles, where each cycle should generally contain applications and dependencies that need to move together. Moving a web server while leaving a latency-sensitive database behind, for example, could create more problems than it solves. AWS recommends associating databases with the applications they support when planning migration cycles.
2. Build the AWS Environment With Infrastructure as Code
After building the workload inventory and assessing the dependencies, we need to create the parallel AWS environment that will run our workloads. A best practice for provisioning this environment on AWS infrastructure is by using Infrastructure as Code (IaC).
It’s important to note here that this new parallel environment can exactly resemble the original infrastructure components or have different components depending on the migration strategy used. For example in a rehosting, a.k.a “lift and shift”, strategy the original infrastructure components are almost kept identical, meaning a workload that’s running on a VM or a set of VMs is transferred to a new set of VMs also, in case of AWS it’s EC2 instances, while a refactoring strategy can decide that a workload architecture gets modernized, and hence its infrastructure components change (i.e., from running a monolithic app inside a VM to running it as microservices using containers, serverless functions, etc).
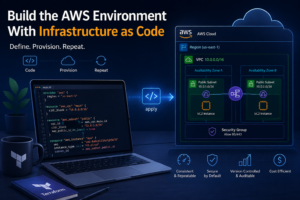
Regardless of how the target environment looks like, we can use IaC technologies such as AWS CloudFormation or AWS CDK to define its infrastructure components including:
- VPCs and subnets
- Security groups
- IAM roles and policies
- Load balancers
- EC2 instances
- ECS/EKS resources
- RDS databases
- S3 buckets
- Route 53 records
- CloudWatch alarms
- Auto Scaling
- Supporting networking and security services
This is also an opportunity to improve your AWS security posture during migration, rather than simply recreating legacy security controls in the new environment.
Instead of manually creating an AWS environment and hoping it matches the design, you can deploy the same configuration repeatedly into development, staging, and production.
AWS CloudFormation’s IaC generator can also create templates from existing AWS resources, which can help bring manually created environments under infrastructure management.
Additionally, you need to keep application configuration, secrets, and infrastructure parameters separate from the code itself. This decoupling ensures that the code can be reused with minimal changes required.
3. Evaluate the Workload Type
Different types of workloads can require different techniques and tools for migration, so it’s important to understand the workload type you plan to migrate and know which available tools are there that can help you with its migration. The following list contains the most common workload types and how you can migrate them to AWS.
1. Migrating Virtual Machines
For traditional VM-based applications, the simplest approach is often rehosting: move the existing server to AWS with minimal application changes.
AWS Application Migration Service (AWS Transform MGN) is designed for this type of migration. It continuously replicates source server data to AWS staging resources, allowing the target environment to be prepared while the source server continues running. AWS describes MGN as a common tool for large lift-and-shift migrations and notes that continuous data protection can support very short cutover windows.
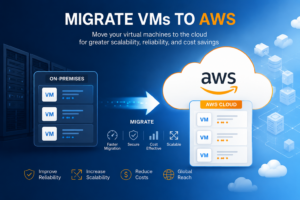
A typical VM migration looks like this:
- Discover the server
Identify:
- OS version
- CPU and memory requirements
- Disk configuration
- Network dependencies
- Installed applications
- Database dependencies
- Scheduled tasks
- External connections
- Install the replication agent
Configure AWS Application Migration Service to replicate the source server.
- Let replication run
The source system continues serving users while the data and changed blocks are replicated to AWS.
- Launch test instances
Create test instances in AWS and validate:
- Application functionality
- Network connectivity
- Authentication
- Performance
- Storage
- Monitoring
- External integrations
- Perform a final cutover
At the migration window:
- Stop or quiesce application writes if required.
- Confirm replication is caught up.
- Launch the production target.
- Update traffic routing.
- Validate the application.
- Keep the source available
Do not immediately destroy the old environment. Maintain it for a defined rollback period.
The critical advantage is that the lengthy data-copy operation happens before the production cutover. The downtime is therefore limited primarily to final synchronization and traffic switching.
MGN is primarily suited to directly attached block storage. Network file systems and shared NAS-style storage require a different migration strategy.
2. Migrating Databases With AWS DMS
Databases are often the most important component when minimizing downtime.
A traditional database migration might look like:
Stop application → export database → copy data → import database → test → restart application
For a large production database, that could create hours of downtime.
Instead, use AWS Database Migration Service (AWS DMS) to perform an online migration.
AWS DMS can keep the source database operational while data is migrated and can continuously replicate changes from the source to the target. This allows the target database to catch up before the final application cutover.
The online DMS pattern
The migration can be divided into three phases.
Phase 1: Full load
DMS copies the existing data from the source database to the AWS target.
For example:
On-premises database → AWS DMS → Amazon RDS / Aurora / EC2 database
The production database continues accepting traffic.
Phase 2: Change Data Capture
After the initial copy, DMS continuously captures changes occurring on the source database.
This means the target gradually approaches synchronization with production.
Monitor replication latency and validate that the target database is receiving changes correctly.
Phase 3: Database cutover
When replication lag is sufficiently low:
- Prepare the application for cutover.
- Stop or pause new writes briefly if required.
- Allow DMS to process the remaining changes.
- Validate the target database.
- Point the application to the new AWS database.
- Resume application traffic.
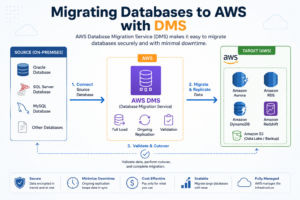
AWS describes this approach as a flash-cut migration: continuous replication keeps source and target synchronized so that the actual cutover can be kept short.
For especially critical systems, database and application migrations can be decoupled. The database can be synchronized first, while application servers are migrated separately. AWS specifically recommends this pattern when minimizing application downtime is more important than simplifying the migration.
Database schema compatibility
DMS is primarily a data migration and replication service. If you’re changing database engines—for example, moving from one database platform to another—you may also need schema and code conversion.
Test:
- Data types
- Indexes
- Stored procedures
- Triggers
- Functions
- Sequences
- Collations
- Character sets
- Application queries
3. Migrating Containers
Containerized workloads can often be migrated with less infrastructure complexity because the application artifact (an OCI-compatible image) is already portable.
A common AWS target architecture is:
Container image → Amazon ECR → Amazon ECS/EKS → Load Balancer → Users
The basic process is:
- Inventory existing container images.
- Push images to Amazon ECR.
- Define ECS or EKS infrastructure using IaC.
- Configure networking and security.
- Deploy the application alongside the existing environment.
- Run functional and performance tests.
- Gradually shift production traffic.
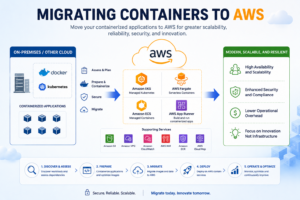
For applications that are currently running on VMs rather than containers, AWS has tools such as App2Container that can help analyze and containerize eligible applications and generate deployment artifacts for services including Amazon ECS and Amazon EKS.
However, don’t combine containerization, database modernization, application refactoring, and cloud migration into one giant change unless there is a strong reason to do so.
For a low-risk migration, it is often better to:
Move first → stabilize → modernize later.
This follows the same principle behind AWS’s recommendation to favor simpler migration strategies for large migrations and perform deeper modernization after the workload is established in AWS.
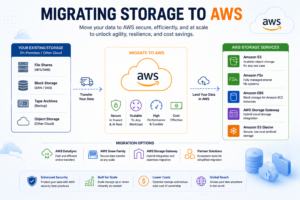
4. Migrating Storage
Storage needs to be treated according to the type of data being migrated.
Object storage
For object-based workloads, Amazon S3 is usually the natural AWS target.
A common pattern is:
Existing object store → continuous/batched synchronization → Amazon S3
Before cutover:
- Copy the existing objects.
- Validate object counts and sizes.
- Synchronize newly created or modified objects.
- Test application access.
- Switch the application to S3.
- Continue monitoring the old storage during the rollback period.
File storage
For shared file systems, identify whether the workload requires:
- NFS
- SMB
- Shared POSIX semantics
- High throughput
- Low latency
- File locking
- Existing directory structures
Depending on requirements, AWS storage services such as Amazon EFS, Amazon FSx, or Amazon S3 may be appropriate.
The important point is to avoid treating file storage like a VM disk. AWS Application Migration Service’s block-level replication does not generally cover NAS/NFS/SMB shared storage, so these systems need their own migration plan.
Storage cutover
For low downtime:
- Perform an initial bulk copy.
- Run incremental synchronization.
- Validate the destination.
- Briefly pause writes if necessary.
- Perform the final sync.
- Redirect the application.
- Monitor for missing or stale data.
4. Use Route 53 Weighted Routing for a Canary Cutover
After evaluating the different types of workloads and using the appropriate technique for migrating each workload, the next step is to plan for switching the traffic from the original environment to the new environment.
One of the most useful techniques for minimizing user impact during this switch is phasing the traffic migration. For workloads capable of supporting a zero-downtime AWS migration, this approach allows production traffic to move gradually while both environments remain available.
So, instead of changing:
100% on-premises → 100% AWS
change:
99% on-premises → 1% AWS
Then:
95% on-premises → 5% AWS
Then:
75% on-premises → 25% AWS
And eventually:
0% on-premises → 100% AWS
Amazon Route 53 weighted routing allows multiple resources to share a DNS name while assigning each resource a relative traffic weight. The weights can be changed progressively, including setting a resource’s weight to zero.
For example:
| Environment | Weight |
| Existing/on-premises | 99 |
| AWS | 1 |
After validation:
| Environment | Weight |
| Existing/on-premises | 95 |
| AWS | 5 |
Then:
| Environment | Weight |
| Existing/on-premises | 50 |
| AWS | 50 |
And finally:
| Environment | Weight |
| Existing/on-premises | 0 |
| AWS | 100 |
This is essentially a canary deployment for infrastructure migration.
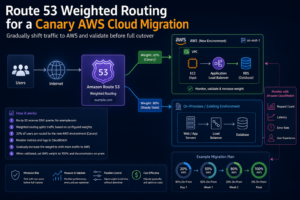
During the switch, you can monitor each step for:
- HTTP 4xx/5xx errors
- Latency
- CPU and memory
- Database errors
- Authentication failures
- Application exceptions
- Transaction success rates
- Business KPIs
- Customer support complaints
If the AWS environment starts behaving unexpectedly, reduce its Route 53 weight or return it to zero.
AWS’s migration guidance specifically recommends phased/canary cutovers because they reduce the number of users exposed to a problem and make rollback considerably easier.
5. Design the Cutover Like a Canary Deployment
A migration cutover should be treated like a production software release.
Before increasing traffic, establish explicit go/no-go criteria.
For example:
Canary stage
- 1% of traffic for 30 minutes
- No increase in error rate
- Latency within agreed threshold
- No critical application errors
Stage 2
- 5% of traffic for 30–60 minutes
- Business transactions validated
- Database replication healthy
Stage 3
- 25% of traffic
- Sustained performance validated
Stage 4
- 50% of traffic
- Operations team confirms stability
Final
- 100% AWS
- Source environment retained for rollback
The exact percentages and durations should depend on traffic volume and business risk.
For a very high-volume application, 1% might already represent thousands of users. For a low-volume application, a longer observation period may be more meaningful than a particular percentage.
6. Canary vs Controlled Cutover
While the canary-style gradual cutover looks perfect for minimizing downtime, it introduces a big challenge with data synchronization and consistency that makes it not always possible to implement.
In a gradual canary cutover, both environments should be working at the same time while the migration is in progress, meaning that users’ traffic is served from both environments. This requires handling things like bi-directional data synchronization and consistency, split brain scenarios and maintaining an authoritative data source, schema compatibility, and network latency. So, if no compatible data architecture is in place that allows for managing such challenges, data loss or corruption can happen.
The simpler and more direct alternative for migration is to use a controlled cutover. In a controlled cutover, 100% of user traffic is switched to the new environment all at once, and only the new environment receives the traffic after that. To do a controlled cutover, data is first bulk-synchronized from the old environment to the new environment, then ongoing data changes that happen on the old environment are synchronized as they’re being written, until both environments are in the closest sync point, then writes are stopped on the old environment, and a final delta sync is applied to the new environment, then all live traffic is switched and the new environment becomes the authoritative system where the service is resumed there.
Although it might introduce a momentary downtime during the switch, a controlled cutover removes the challenges of canary cutover for having both environments actively serving user traffic simultaneously, because in a controlled cutover only one environment at a time is actively serving user traffic.
7. Make Rollback a First-Class Requirement
After the migration is started, you still need a quick and tested solution that acts as a safety net in case an issue happens after migrating part or all of the environment. The simplest solution to this is rolling back to the existing older environment.
A rollback plan might be as simple as:
- Set the AWS Route 53 weight to 0 for the new environment and 100 for the old environment.
- Restore traffic to the existing environment.
- Investigate the AWS issue.
- Re-synchronize data if necessary.
- Retry the migration.
But database migrations make rollback more complicated.
Once users are writing new data to the AWS database, simply redirecting traffic to the old database may cause data loss or inconsistency.
Therefore, before cutover, explicitly define:
- Which database is authoritative?
- Can writes occur on both sides?
- How is data synchronized?
- What happens to transactions created after cutover?
- How long is rollback supported?
- Who has authority to initiate rollback?
AWS notes that active/active database configurations can support more gradual traffic movement but introduce significantly more complexity around synchronization and data consistency.
For many applications, the safer approach is therefore to keep the database cutover tightly controlled, rather than attempting an unnecessarily complex dual-write architecture.
8. Monitor the Migration in Real Time
During the migration, monitoring is part of the control plane.
Create dashboards before the cutover showing both the old and AWS environments.
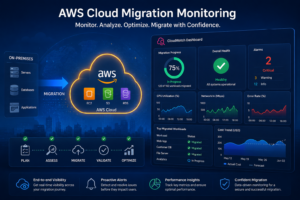
Track:
Infrastructure
- CPU
- Memory
- Disk utilization
- Network throughput
- Instance health
Application
- Request rate
- Response time
- Error rate
- HTTP status codes
- Application exceptions
Database
- Replication lag
- Connections
- Query latency
- CPU
- I/O
- Failed transactions
Business metrics
- Orders completed
- Payments processed
- Logins
- Searches
- API transactions
- Customer-facing errors
Technical metrics alone aren’t enough. An application can have healthy CPU utilization while customers are unable to complete purchases.
9. A Practical Low-Downtime Migration Sequence
Putting everything together, a typical migration can follow this sequence.
Phase 1 — Assess
Inventory workloads, dependencies, data, traffic patterns, and downtime requirements.
Phase 2 — Build AWS
Create the AWS landing zone, networking, security controls, monitoring, and IaC.
Phase 3 — Replicate
- VMs → AWS Application Migration Service
- Databases → AWS DMS
- Containers → ECR + ECS/EKS
- Files → appropriate AWS storage service
- Objects → S3
Phase 4 — Test
Launch the AWS workloads without sending meaningful production traffic to them.
Test functionality, performance, security, integrations, and disaster recovery.
Phase 5 — Synchronize
Allow data replication to continue until the AWS environment is effectively caught up with production.
Phase 6 — Cutover (Canary or Controlled)
Use Route 53 weighted routing or an equivalent load-balancing mechanism to send a small percentage of traffic to AWS.
Phase 7 — Observe
Compare AWS against the existing environment using technical and business metrics.
Phase 8 — Increase
Gradually move traffic:
1% → 5% → 25% → 50% → 100%
The percentages and observation periods should be adjusted based on workload risk.
Phase 9 — Complete
Once AWS has successfully handled production traffic, stop replication and decommission the old environment only after the agreed rollback period.
Conclusion
To achieve a minimal downtime AWS migration, you need to start with a strategy rather than targeting a cutover timeline or fast migration. The high-level target for this strategy is to build the AWS environment in parallel, automate it with IaC, continuously replicate data, validate the new environment before users depend on it, and treat user traffic migration as a canary deployment by gradually switching it.
For VMs, AWS Application Migration Service can replicate workloads while they remain online. For databases, AWS DMS can perform an initial load followed by continuous change replication. Containers can be deployed to Amazon ECS or Amazon EKS alongside their existing counterparts. Storage can be synchronized before the final switch. And Route 53 weighted routing can gradually move users from the old environment to AWS rather than forcing everyone through a single cutover event.
The overarching pattern is simple:
Replicate first. Validate second. Shift traffic gradually. Monitor continuously. Keep rollback available.
That approach turns a risky cloud migration into a controlled production deployment—and can reduce the user-visible downtime to little more than the final synchronization and traffic transition.